| Run the demo (all demos require Visual C++ 5.0!) | |
| Download the demo source |
Dialog Boxes with Bitmapped Backgrounds
By: Kenn Scribner for TechTalk
| Run the demo (all demos require Visual C++ 5.0!) | |
| Download the demo source |
Background: I forget where I first saw a dialog with a custom bitmapped background, but I remember I was impressed. After working with dialogs for awhile, I finally hit upon the answer even before I read it in MSJ--WM-ERASEBKGND. The trick is to deal with the child controls, as you'll see. This article is related to the article on subclassing and custom controls, and laid the foundation for my own custom control learning experience. |
Dialog Boxes with Bitmapped Backgrounds
If you're like me, you probably like learning new tidbits that help make your programs more professional. Some tips are purely functional and should be used anytime you write a professional application. Other tips, though, are meant to be more aesthetic and should be used in certain situations, as your application's needs dictate. In this case, I'm referring to providing a bitmap as a dialog box background.
When you bring up a dialog box in your program, you normally want Windows to handle the painting aspects. For the most part, this is fine. Sometimes, though, you'll want to add some style, some flair, and set your application apart from the rest. One small way to do this is to provide an interesting background for your application's dialog boxes, or perhaps a subset of them, such as the "About" dialog box (I also use this technique for "splash" screens, which we'll cover in a future issue). How often you do this is, of course, up to you, but I do have a general recommendation: use this technique sparingly and for emphasis. You'll see the wooden plank bitmap I used in the demonstration program--a bit much! The demo's "About" box is more like it. There, I use the Microsoft "Internet Explorer" "CoolBar" bitmap, which is more subtle. Taste and style can’t be dictated, but in general I personally go for the subtle "little something extra" rather than overkill. Definitely go with what "feels" right for your application.
Let’s see some details. There are two major secrets to painting the dialog box's background. First, we need to know when to paint our bitmap. Then, when the individual dialog box controls need painting, we need to inform them of any painting requirements we impose, such as possibly using a different text color and a transparent brush (so the bitmap shows through the control). As is typical for Windows applications, the trick is to respond to certain Windows messages to perform our magic.
First, let's look at the actual background painting. To begin, you need a bitmap. Got one? Okay! Load it into the Resource Editor as a bitmap resource, and as you normally do, give it an identifier. One thing, though. The Resource Editor will default to 16 colors. That's okay…if you want 256 colors, select "256 Colors" under the "Properties" tab and reload the bitmap (the reloading is important, as Resource Editor seems to remove the extra color information when it first loads the bitmap). My bitmaps use even higher resolutions, so you won’t be able to see them in Developer Studio’s editor (copy your higher-resolution bitmap file over the file Developer Studio saves in the \res directory). Given our bitmap, we'll create a member variable of type CBitmap which will contain the bitmap data throughout the life of the dialog box.
We'll follow the same procedure we used with our transparent bitmaps, in that we'll load the bitmap resource and store the bitmap's size for later use. In the dialog box's case, we'll typically do this work in the class constructor, where we also may create a hollow (null color) brush for future control painting. Once we have added the bitmap loading code, we need to add code to handle the WM_ERASEBKGND Windows message.
There is a problem, though. ClassWizard doesn't give us this option! This isn’t a really big problem--we'll simply add it manually. First, add these lines to the dialog box's class header file (just prior to the DECLARE_MESSAGE_MAP() macro call):
afx_msg BOOL OnEraseBkgnd(CDC* pDC);
This is our function prototype, which is now a class member function. Then, add this line to the dialog box's source (.cpp) file, just prior to the END_MESSAGE_MAP() macro call:
ON_WM_ERASEBKGND()
This adds the WM_ERASEBKGND message to our message handler--without this, MFC won't route the message to our class for processing. The actual function will look something like this:
BOOL CDlgBgndDlg::OnEraseBkgnd(CDC* pDC)
{
CDC dcMem;
// "Tile" bitmap (see demo for actual code)
return TRUE; // tell Windows we handled it
}
Here, we basically "tile" the bitmap by BitBlt()'ing it from the upper left-hand corner of the dialog's client area to the lower right (very much like you'd place ceramic tile on a floor). For space reasons, I've omitted the actual code--see the demonstration source code for that.
Now, when we run our program and bring up the dialog box, we'll see the bitmap we've selected. But. Notice the controls, especially the text controls, such as static text. Do they look good? Can you see your background underneath them? Well, probably not. In all likelihood, you'll want to change the individual control's color, as well as set the background mode the control will use (transparent). To do that, we need to intercept the WM_CTLCOLOR family of Windows messages. There are a myriad of issues surrounding dialog child controls and their painting requirements we must address to truly make our specialized dialog appear as we would like it to appear. Some are easy to address, and some are more difficult (and advanced!).
Whenever we assume the duties Windows normally handles for us, it usually means we have the opportunity to write a lot of code! On the other hand, sometimes the spectacular effects are very much worth the effort. When we override the default dialog box painting routines, we’ve just taken a step into advanced Windows programming, at a cost of more code to be written.
By now you’ve probably downloaded and executed the demonstration program from the last issue. Did you notice the static text changes color when you select a new background bitmap? You also probably noticed the background bitmap shows through the text—the text is painted with transparent regions. As I mentioned in the last issue, this is done by intercepting the WM_CTLCOLOR family of Windows messages
Controls send this message to their parent windows whenever they need to repaint themselves. Essentially, when we process this family of Windows messages, we will provide the individual control with some sort of brush. But at the same time, though, we are also free to set the background mode, establish a desired text color, or in some other way affect the control’s painting process.
An interesting historical twist is Windows originally sent the WM_CTLCOLOR message only…in these Win32 days, Windows will specify the particular control, as in WM_CTLCOLORBTN or WM_CTLCOLOREDIT. MFC, however, hides this fact from us and passes each control's request, be it a button, text, or whatever, through the CWnd::OnCtlColor() function. When handling this function, we are free to ask what kind of control it is and act accordingly.
That's a good thing, too! As it happens, mucking with the edit control’s or the related listbox control’s paint processing is a bad thing in most cases. After all, we're changing the "look and feel" of the control, which can be confusing to some users. It should look like an edit control. Worse, we introduce side effects, such as text not erased when you hit the backspace or delete keys. If we check the control type and keep ourselves from modifying an edit control’s or the listbox control’s painting behavior, we should be safe. The demonstration source code does just this:
HBRUSH CDlgBgndDlg::OnCtlColor(CDC* pDC, CWnd* pWnd, UINT nCtlColor)
{
if ((nCtlColor == CTLCOLOR_EDIT) ||
(nCtlColor == CTLCOLOR_LISTBOX)) {
// Handle edit and list controls as special
// cases and disallow their transparency
} // if
else {
// Do custom work for transparency and color
} // else
// Return our null brush
return m_brHollow;
}
Actually, the demonstration code is a bit more complex, as I give you the option of changing the background bitmap on the fly, as well as changing how edit/listbox control painting is handled. I had to add special code to make that happen correctly. The code above is the "normal" way to do things.
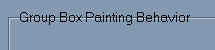
Unfortunately, not all controls are so easy to bend to your will. Group boxes, like edit controls, also don’t react well to transparency. They, and many controls like them, either use the background erasure process to clean up a region prior to painting (like the edit control), or they involve multi-step drawing processes that assume the previous steps completed in a certain manner. In the case of the group box, the text used for the label is placed over the lines used to delineate the group box, thus overpainting the lines underneath the label. If the label text is painted with transparency, you see the lines underneath the label after the label is painted:
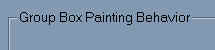
Rather, this is probably the effect you would normally seek:
In this issue’s demonstration program, I simply avoided the issue by not using a label on the group box! The true solution to this problem is to completely override the control’s painting behavior, and this very advanced topic is what I’ll address next time. Icons, group boxes, and even the simple static text control, should be provided with custom painting behavior, and we’ll talk about how and why next time.
Happily, though, in general we don’t typically require most controls to do much, especially static ones. If we’re not interested in changing static text once the dialog is shown, for example, then we need not do anything more than we did above (which saves us code). So for many custom dialogs, then, the technique shown here works wonderfully.
So there you have it—simple custom background dialog boxes. To me, this is one of those "fun" things to do that adds that "little bit extra" to your finished product. If you haven’t already downloaded the demonstration program, you’ll find it at the top of page. Until next time, pick your favorite bitmap and try this technique on one of your own dialog boxes. It's a lot of fun to see in action!
Comments? Questions? Find a bug? Please send me a note! |