| Run Part 1's demo program (all demos require Visual C++ 5.0!) | |
| Run Part 2's demo program | |
| Download Part 1's demo source | |
| Download Part 2's demo source |
By: Kenn Scribner for TechTalk
| Run Part 1's demo program (all demos require Visual C++ 5.0!) | |
| Run Part 2's demo program | |
| Download Part 1's demo source | |
| Download Part 2's demo source |
If you have problems downloading the demo source files, it is because my ISP deleted them from my account (for some stupid reason). I will reload them ASAP.
Background: I was just learning MFC when I had the opportunity to attend a Windows Developer's Conference (definitely go if you have the chance!). While there, most of the authors who write the Windows books we read gave instruction or otherwise discussed some aspect of Windows programming. One, of course, was Mike Blaszczak, who is now in charge of MFC development at Microsoft. He was giving a full day course on MFC programming. And in all the material he discussed, not once did he mention DDX/DDV, which was a concept I was having problems with. I asked him about this after the day, and he told me something I still remember, and that's to keep in mind the dialog box is a window. Once it's gone, it's gone. Period. But a C++ class that encapsulates the mechanics of the window is persistent beyond the life of the actual window, and DDX/DDV is the mechanism MFC uses to extract information from the window controls (or place information there) after (before) the window is actually created. This was a phenominal concept for a SDK programmer like me...once a dialog box dies, the information stored in the controls there is dead, too. But not in MFC-land. Cool! So I figured the DDX/DDV stuff out and hope what I learned helps you, too. |
MFC’s Dialog Data Exchange (DDX) and Dialog Data Verification (DDV)
Part I, From the Application’s
Perspective
(Part II, From the Dialog’s Perspective)
If you’re new to Microsoft Foundation Class (MFC) programming, or C++ programming in general, then there are probably many areas you find confusing or hard to understand. That’s okay! Really! Even (or should I say "especially"?) veteran programmers have questions from time to time. If I had to pick one area where I receive the most inquiries, it would have to be Dialog Data Exchange (DDX) and Dialog Data Verification (DDV). Collectively, these mechanisms provide you a means to transfer information from your main application to and from a dialog box you wish to display. And although they may seem cryptic at first, spending the time to learn to use them will save you pain and agony in the long run!
First, how would we build a dialog in the days of ‘C’ and the Windows SDK? Well, we’d most likely insert a command into a menu, which would trigger a call to DialogBox(), or a derivative, in our command message handling code. One of the parameters passed to DialogBox() is a pointer to a subroutine we created to actually bring up the dialog box. If this dialog box required initialization, such as filling in default text in an edit box, we’d (probably) either hard-code the text into our WM_INITDIALOG handler or use a global variable as a text container. If the user modified the text, we’d have to write the new string back to the global variable or find some other viable means of retrieving the string prior to the dismissal of the dialog box. Why? Because once the dialog box has been dismissed, all of its local variables are destroyed and no longer accessible (in technical terms, the subroutine terminates, which frees the variables stored on the call stack).
Ooh, there were some ugly words in that last paragraph. "Global variables"? Well, we did what we had to do to get our applications out the door on time. But today’s Windows programmer can use the power of C++ and the MFC. Let’s now think in terms of C++, then add some MFC concepts as they relate to a dialog box. In C++, when you instantiate an object from a class, the object exists until you specifically destroy it, either manually or by leaving your own current scope. So unlike a typical ‘C’ subroutine, our C++ class may have as many member functions (subroutines) and member variables ("global" to that class) as we like. Best of all, we can keep the object derived from the class around for as long as we need it. Now, suppose that for a minute we developed a class using MFC designed to display a dialog box. We could tell the object derived from the class to display itself, and when the user dismissed the dialog box, the C++ object would still exist, as we have not taken action to destroy it. (A side note: MFC classes "contain" windows, or window handles, as if the class were a bottle…the class "holds" the window handle but is not the window itself.)
So far, then, we know we can create a class to display a dialog box. Any class we create may contain member variables which we are free to initialize (assuming they are created as public). So, we build this dialog class, add some public member variables, and go to town. Right? Well, not quite yet. The problem we have is the dialog box, as a window, contains controls such as edit boxes, static text, radio buttons, etc. The class we instantiated merely holds a window handle, and even that is invalid until the dialog box itself is created. So how do we fill the controls inside the dialog box before it’s created? We do so by using DDX.
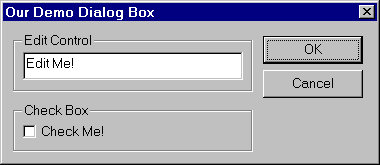
Our first task on the road to using DDX is to create a main application, then create a new dialog box class. Assuming you’ve built your basic application (another topic, another day), you first "lay out" your dialog box using the dialog box editor (or resource editor, if you prefer) in Visual C++. For example, let’s insert a new dialog box, IDD_MYDIALOG. Then, include a text edit box we’ll call IDC_EDITBOX and a check box we’ll call IDC_CHECKBOX (for the check box text, use "Check Me!"). Feel free to arrange these controls and give the dialog box any style or ornamentation you wish.
Now, activate the Class Wizard by selecting it under the "View" menu. We’ll use the "Add Class" button under the "Message Map" tab—press this button and select "New". This will activate another dialog box, where we’ll call our new class "DemoDialog" (under "Name") and give it a base class of CDialog (under "Base Class"). Note you should see the dialog identifier IDD_MYDIALOG "Dialog ID". To be sure Class Wizard saves your work to date, click OK twice. This will exit Class Wizard and store some new files for you…these are your dialog box class files.
Again activate Class Wizard, only this time select the "Member Variables" tab. Do you see your control identifiers, IDC_EDITBOX and IDC_CHECKBOX? You should. IDC_CHECKBOX will be highlighted in the list box, so just press "Add Variable" and type in the variable name m_bIsChecked and press "OK". Note Class Wizard gave you a default variable type of boolean. To create a variable for IDC_EDITBOX, press "Add Variable" again and type the variable name m_strText. Class Wizard gave this variable a default class of CString.
In our main application, we need to modify our menu and/or toolbar to add a command to activate our dialog box. Assuming we’ve added a command to "Demo the Dialog" (again, another topic, another time), we’ll add a message handler (in Class Wizard) to handle the user command to display the dialog box. Assuming the message handler is named "OnViewDemodialog", we would edit the handler to look like this:
void CMainFrame::OnViewDemodialog()
{
	// Let's set a CMainFrame boolean variable to use for our UI command
	// handling.
	m_bDemoDlgActive = TRUE;

	// Here, we create our dialog box class and initialize the
	// member variables.
	CString strResult;
	CDemoDialog MyDialog;

	MyDialog.m_strText = "Edit Me!"; // fill in edit box
	MyDialog.m_bIsChecked = FALSE; // set up check box

	if ( MyDialog.DoModal() == IDOK ) {
		// If the user pressed "OK", we'll stuff the results onto the
		// control bar.
		strResult.Format("(Returned: '%s','%s')",MyDialog.m_strText,
					(MyDialog.m_bIsChecked ? "checked" : "unchecked"));
	} // if
	else {
		// User pressed "Cancel", so write to control bar.
		strResult = "(Canceled)";
	} // else

	// Update status bar
	m_wndStatusBar.SetWindowText(strResult); // always use for pane 0...

	// Reset our boolean.
	m_bDemoDlgActive = FALSE;
}
If you successfully compiled this and ran the resulting program, you could bring up the demonstration dialog box, modify the edit control, check the check box, and press "OK". What you would see would be the text you entered and the status of the check box displayed on the status bar (at the bottom of the window). The MFC DDX mechanism did all of the work for you! To you, working with your dialog box was as easy as working with another C++ class’ member variables. Class Wizard is really something!
There is one other thing to consider, though. We didn’t place any limitation on how long the edit control string could be. Conceivably, you could type in half of War and Peace, which would really goof up our fancy status bar output! This is a case for DDV, or Dialog Data Validation. Using DDV, we can place limitations on the values the dialog’s member variables may take. One such limitation is the total number of characters a string may represent, which sounds perfect for this application. Other DDV choices depend upon the type of variable, but most are pretty obvious, such as numerical limitations and such. Be sure to see the Visual C++ "help" file (refer to "DDV" under the "Help" menu item).
So, let’s modify our current program to use DDV. Naturally, your application needs dictate what limitations, if any, make sense. In this case, any limitation is purely arbitrary, so let’s pick 32 characters. By now, you may not be surprised to use Class Wizard again. Activate Class Wizard and select the "Member Variables" tab. You’ll again see the member variables in the list box, assuming the CDemoDialog class is shown in the "Class Name" pull-down list. To activate DDV for the edit box, click on the IDC_EDITBOX line. Do you see the edit control near the bottom of the dialog? This is where you type the maximum number of characters (32). When you do this and click "OK", you’ve just enabled DDV! Now, recompile the program and try to type more than 32 characters in your demonstration dialog box…MFC won’t let you do it. The edit control sits there and "beeps" at you!
So that’s all there is to DDX/DDV from the main application’s viewpoint. I’ve written a simple demonstration program, which you can download (see top of page). Of course, there are some details from the dialog box’s side, as we’ll see in Part II. Read on!
MFC’s Dialog Data Exchange (DDX) and Dialog Data Verification (DDV)
Part II, From the Dialog’s Perspective
Last time we discussed DDX/DDV primarily from the main application’s perspective. We did touch on the dialog box’s view of DDX/DDV when we used Class Wizard to add member variables we associated with our dialog box controls. Class Wizard loaded our source files and added statements in several places to activate the DDX/DDV mechanism, but we didn’t actually edit the dialog box’s source code ourselves. What if we wanted to know what initializations the main application performed? Or how would we make changes to a control based on user inputs while the dialog box is running. To do this, we need to edit the dialog box’s source code and use a related DDX/DDV function, UpdateData();
First, let’s talk about UpdateData(), then let’s modify our dialog box code to do something a bit more interesting. Not too interesting, as this is a cheap demo! But hopefully you’ll see the power DDX/DDV and UpdateData() give you over the controls within the dialog box.
UpdateData() is a member function of the CDialog class, and its sole job is to transfer information from the dialog’s member variables to and from the dialog’s controls. Essentially, you call UpdateData(TRUE) to take the values currently held by the controls and transfer that information to the class’ member variables, where it is much easier to work with them. For example, in general it’s much easier to work with a CString member variable than it is an edit control window. After you’ve modified the member variable, you would call UpdateData(FALSE) to transfer the member variable contents back to the control. Note you are subject to any DDV limitations you’ve placed on the control --if you exceed the DDV limits, the user will see an error message box telling them there was a DDV limit error, which will be confusing to them.
UpdateData() works especially well when you’re initializing things in OnInitDialog(), though you will typically also use it when handling some user-generated event. For example, if the user clicks "this" button, you might fill "that" edit control with some default text or disable some other control window. You can easily decide, for example, if the check box has been checked by including this code segment:
UpdateData(TRUE);

if ( m_bIsChecked ) {
	// Check box has been checked, so do something
} // if
else {
	// Check box is unchecked, so do something else
} // else

UpdateData(FALSE);
Note I first called UpdateData(TRUE) to "fill in" the member variables associated with the dialog controls. If I didn’t do this, I’m not guaranteed the member variable will contain current (i.e.: useful) information. When we call UpdateData(FALSE) in this case, the edit control will be filled with the text "I’ve been checked!".
So, let’s now add this code to our demonstration dialog box. As usual, we’ll activate Class Wizard. This time, select the "Message Maps" tab with CDemoDialog showing in the "Class Name" oull-down list. Do you see the identifier for the check box, IDC_CHECKBOX? Click this, and you’ll notice the control can return BN_CLICKED (as well as the double-clicked cousin). Click BN_CLICKED, then click "Add Function" to add the message handler (we’ll accept the default name). Click "OK" twice to save the changes to the source code file.
Next, we’ll add this code:
void CDemoDialog::OnCheckbox()
{
	// If the check box has been checked, fill in the edit box
	UpdateData(TRUE);

	if ( m_bIsChecked ) {
		// Check box has been checked
		m_strText = "I’ve been checked!";
	} // if

	UpdateData(FALSE);
}
When the user clicks the check box, OnCheckbox() determines if the action "checked" the box (m_bIsChecked is TRUE), and if it has been, it blasts some text into the edit control. Naturally, you might wish to store the original text string for later use instead of simply overwriting it. The string is unmolested until we modify it in the if/else block, so you could take action prior to this. I make this point because once UpdateData(TRUE) is executed, the member variables associated with your dialog controls contain good information, and you’re free to act upon that information as your application requires.
One cautionary note, however, is to be sure you use UpdateData() only after OnInitDialog() begins execution. You may certainly use it while you’re processing in OnInitDialog(), but don’t use it in the class constructor or in any function called prior to OnInitDialog(). This is because UpdateData() works with both your member variables and the controls contained by your dialog box, which are windows themselves. There are no windows, or valid window handles, prior to OnInitDialog() processing! In a debug build, you’ll "trip an ASSERT". In a release build, you’ll probably crash. Okay, you’ll crash. It’ll be very bad.
Hopefully these articles have helped with any questions you may have had regarding DDX and DDV. Of course, you may download the source code for this demo program (see top of page). If you have other questions, be sure to let me know. Good luck!
Comments? Questions? Find a bug? Please send me a note! |